
Page 9 - hb1713_2
P. 9
R.L.W.
Pioneer Oil Refinery: California Star Oil Works kit #RLW-1680
After the adhesive sets, check for verticality when placed on
a flat surface, and sand base on your sanding board as
required. Note where two of the stack bases must be
trimmed to fit “site” base, and cut away that portion of the
chimney base, clean sanding dust off, and paint as described
in “Working With Resin Castings”.
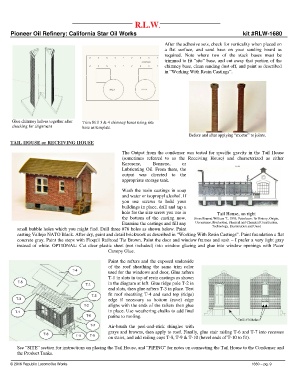
Glue chimney halves together after Trim Still 3 & 4 chimney bases using site
checking for alignment base as template
Before and after applying “mortar” to joints.
TAIL HOUSE or RECEIVING HOUSE
The Output from the condenser was tested for specific gravity in the Tail House
(sometimes referred to as the Receiving House) and characterized as either
Kerosene, Benzene, or
Lubricating Oil. From there, the
output was directed to the
appropriate storage tank.
Wash the resin castings in soap
and water or isopropyl alcohol. If
you use screws to hold your
buildings in place, drill and tap a
hole for the size screw you use in
Tail House, on right
the bottom of the casting now. (from Brannt, William T., 1895, Petroleum: Its History, Origin,
Examine the castings and fill any Occurrence, Production, Physical and Chemical Constitution,
Technology, Examination and Uses)
small bubble holes which you might find. Drill three #76 holes as shown below. Paint
casting Vallejo NATO Black. After dry, paint and detail brickwork as described in “Working With Resin Castings”. Paint foundation a flat
concrete gray. Paint the steps with Floquil Railroad Tie Brown. Paint the door and window frames and sash – I prefer a very light gray
instead of white. OPTIONAL: Cut clear plastic sheet (not included) into window glazing and glue into window openings with Pacer
Canopy Glue.
Paint the rafters and the exposed underside
of the roof sheathing the same trim color
used for the windows and door, Glue rafters
T-1 in slots in top of resin castings as shown
in the diagram at left. Glue ridge pole T-2 in
end slots, then glue rafters T-3 in place. Test
fit roof sheathing T-4 and sand top (ridge)
edge if necessary so bottom (eave) edge
aligns with the ends of the rafters then glue
in place. Use weathering chalks to add final
patina to roofing.
Air-brush the peel-and-stick shingles with
grays and browns, then apply to roof. Finally, glue stair railing T-6 and T-7 into recesses
on stairs, and add railing caps T-8, T-9 & T-10 (bevel ends of T-10 to fit).
See “SITE” section for instructions on placing the Tail House, and “PIPING” for notes on connecting the Tail House to the Condenser and
the Product Tanks.
© 2016 Republic Locomotive Works 1680 – pg. 9